Whether you are going for the new iPhone 16 series or upgrading your old device to a more recent model with reduced prices, there is always one thing worth pondering: how to transfer data from iPhone to iPhone. Be it a new iPhone with zero content or a used one with existing data, different scenarios might require different transfer solutions to tackle. And here in this post, we have put together a full tutorial explaining how to transfer data from iPhone to iPhone. Either to perform a full backup of the source iPhone or select a flexible iPhone transfer without erasing existing data, this post got you covered.
How to Transfer Data from iPhone to iPhone via iCloud
For a computer-less iPhone data transfer solution, iCloud could be a good choice if your total data size is less than 5GB, otherwise, you will have to upgrade your iCloud through optional paid plans. Alternatively, you can use another iOS data management tool to transfer data from iPhone to iPhone without iCloud.
1. Transfer Data from iPhone to iPhone with iCloud Backup
Step 1. Back up the source iPhone.
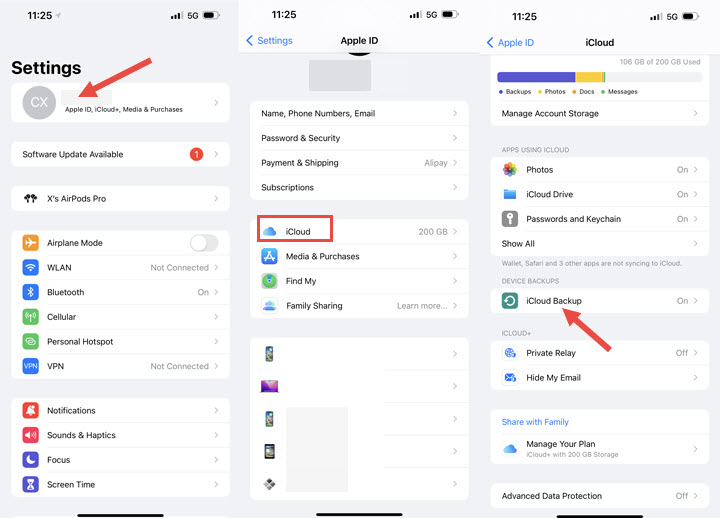
On your old iPhone, go to Settings > Tap at [Your Name] > iCloud > iCloud Backup > Back Up Now.
Note: In iOS 10.2 or earlier versions, iCloud is listed right under settings.
Step 2. Transfer data from iPhone to iPhone.
#1. Transfer data from iPhone to iPhone when setup:
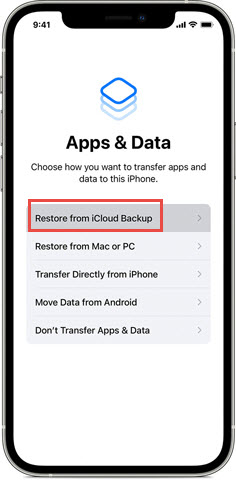
To transfer data from your old iPhone to your new one using iCloud backup when setup, follow these steps: Power on your new iPhone and select your preferred language > Connect to a Wi-Fi network > Set up Face ID or Touch ID and create a passcode > On the Apps & Data screen, choose to Restore from iCloud Backup.
#2. Transfer data from iPhone to iPhone after setup:
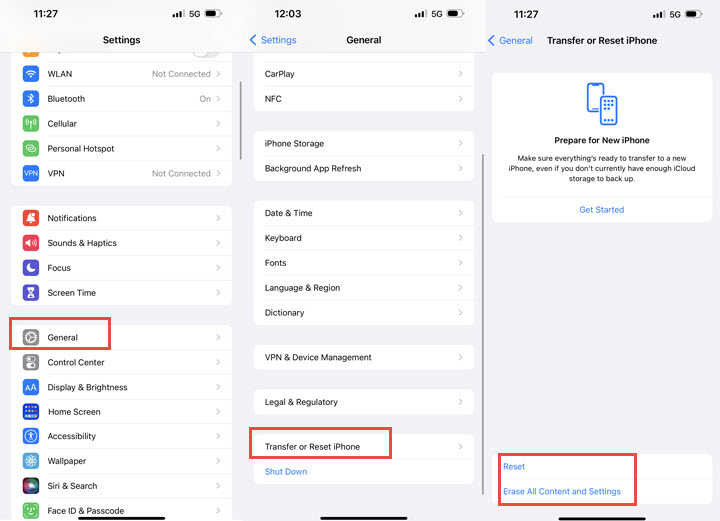
If you have completed the setup process already for your new iPhone and couldn't find the option to restore from iCloud backup, try the following steps: Go to Settings > General > Reset > Erase All Content and Settings > Erase Now, and then set up your iPhone again > Select Restore from iCloud Backup, sign in and select the backup you just created to restore.
2. Selectively Transfer Data from iPhone to iPhone with iCloud Sync
For those who wish to perform partial data transfer on their iPhone device, you can check out iCloud sync, which allows the ability to sync photos, mail, calendar, notes, contact, files, etc.
Step 1. On your old iPhone, go to Settings > [Your Name] > iCloud, and toggle on the content types you prefer to sync.
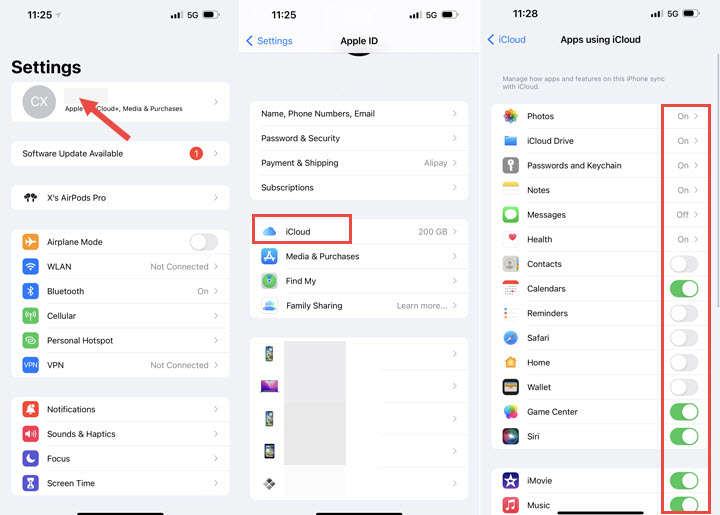
Step 2. On your new iPhone, repeat Step 1, and wait for the selected content to be transferred to the new device.
How to Transfer Data from iPhone to iPhone via Quick Start
Quick Start is another way to set up and transfer data between iPhones without iCloud. If both iPhones are running iOS 12.4 or later, Quick Start allows for wireless data transfer through the iPhone Migration option.
And to use Quick Start:
- Your source and destination iPhones must be running iOS 12.4 or higher.
- Keep both devices close to each other throughout the entire process (or use a USB3 Camera Adapter and a Lightning cable to connect two iPhones).
- Stay connected to power in case your iPhone turns off accidentally if you have large-size data to move over.
- Make sure that your current device is connected to Wi-Fi and Bluetooth is on.
Step 1. Initiate Quick Start.
Turn on your new device and place it near your current device. Follow the onscreen instructions to get started.
If the prompt to set up your new device disappears from your current device, restart both devices.
Step 2. Scan the animation to set up.
Use your old iPhone to scan the animation on your new iPhone, or tap Authenticate Manually in case of camera malfunction. On your new iPhone, enter the passcode of the old iPhone, and follow the instructions to set up a touch ID or face ID.
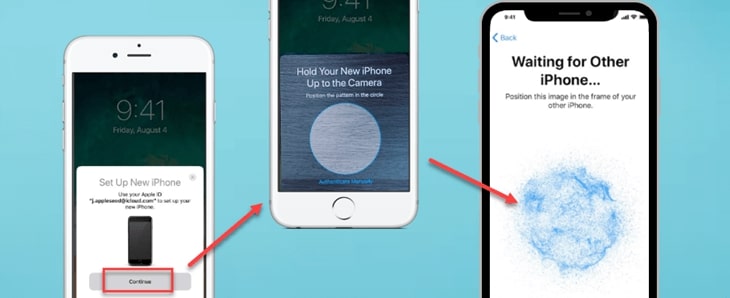
Step 3. Choose how you want to transfer data to the new iPhone.
- Tap on Transfer from iPhone (the new iPhone migration utility implemented in iOS 12.4) to transfer your data from your old iPhone to the new.
- If you tap on Download from the iCloud instead, your data will be pulled from iCloud backup that you created in the past on the source iPhone. This is the old way to transfer data to a new iPhone by restoring from an iCloud backup.
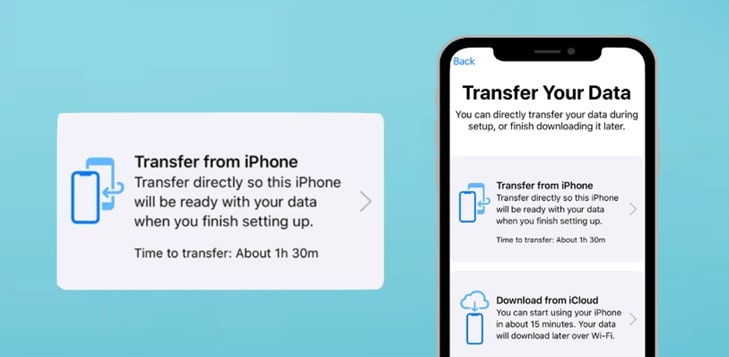
Step 4. Start transferring data from iPhone to iPhone.
Follow the instructions to set up and the transferring process will begin. You will see the estimated remaining time on both screens, and keep your devices near each other and plugged into power until the data migration process is complete.
The transfer times can vary based on the factors such as network conditions and the amount of data being transferred.
How to Transfer Data from iPhone to iPhone via Prepare
Apple's Prepare for New iPhone (or iPad) feature allows users to seamlessly transfer all of their data from an old iPhone (or iPad) to a new one by temporarily backing up all of their iPhone's data to iCloud. This can be done regardless of whether the user has a paid iCloud storage subscription plan, ensuring that none of their information or data is lost when switching to a new device.
Note:
- After the new iPhone is fully set up, the iCloud service will return to your previous storage plan, unless you upgrade your iCloud storage. Apple didn't explain in detail what will happen to the "temporarily back up data" feature, but it can be inferred that if you opt not to upgrade your iCloud storage plan, the data is likely to lose due to insufficient storage. Thus it is suggested to fully back up your iPhone to your computer instead of relying solely on iCloud before transferring data to your new iPhone.
- " 'Transfer or Reset iPhone' option missing?" Some users on iOS 15 fail to find the "Transfer or Reset iPhone" option, and thus won't be able to enjoy that temporary iCloud storage feature during Quick Start iPhone Migration. In that case, try upgrading to iOS 17 and see if the option is available.
Step 1. Go to Settings > General > Transfer or Reset iPhone.
Step 2. Tap on Get Started under Prepare for New iPhone or Prepare for New iPad > Continue, and Apple will upload all your apps and data to iCloud, keep it up to date and ready to transfer to your new iPhone once it arrives.
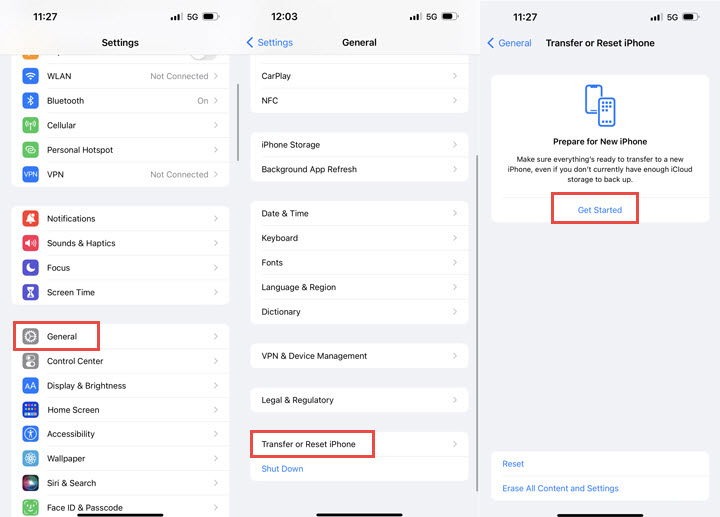
Tip: You can check on the backup progress on the main Settings screen, and if you need more than 21 days of temporary storage, you can ask Apple to extend your free storage.
How to Transfer iPhone to iPhone on PC/Mac (Selective & Full Transfer)
For those who prefer to perform a flexible transfer without overwriting the existing data on the target phone or those who are reluctant to go through hours of transfer to use the new iPhone, you can check out DearMob iPhone Manager, a capable iOS data transfer tool on Windows/Mac.
Whether you're looking to transfer iOS data from an old iPhone to the new iPhone 16/Plus/Pro/Pro Max, or simply want to transfer content from one iPhone to another, DearMob iPhone Manager provides a safe and easy solution. This robust iOS manager allows you to selectively transfer all or some of your iOS content to your iPhone without deleting any data on the destination iPhone. You can also create an incremental backup of your old iPhone and restore it to the new iPhone.
DearMob iPhone Manager - Selectively or Entirely Transfer Data from iPhone to iPhone
- Backup and transfer iPhone photos, contacts, and media files with ultra-flexibility.
- Quick & safe iPhone 16 switch; backup the entire or selective data without storage limit.
- Create custom ringtones, convert to Apple-supported format, encrypt files, unlock DRM, and more...
- Lightning-fast and stable transfer to transfer data from iPhone to iPhone without freezing.
Free download and install DearMob iPhone Manager on your PC or Mac, connect your old iPhone to the computer, and make sure to unlock the iPhone screen for a successful connection. Tap to trust this computer when you are prompted on your iPhone.
1. How to Transfer All the Data from iPhone to iPhone 16/15/14/13 etc.
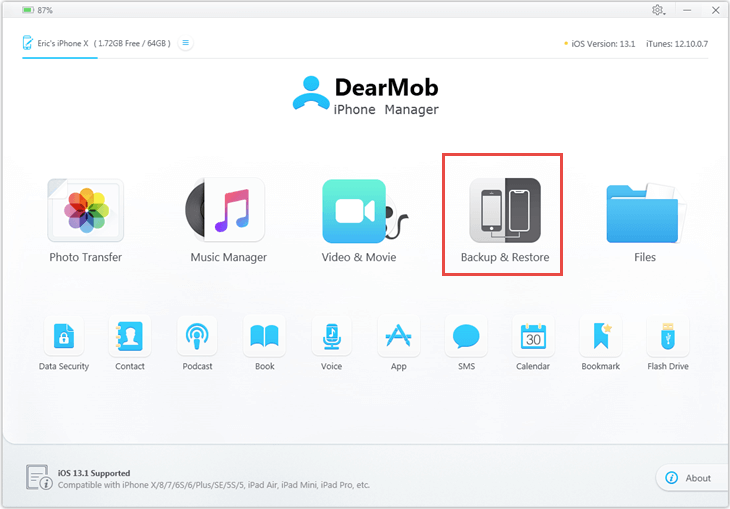
Step 1. Go to the Backup section in DearMob iPhone Manager.
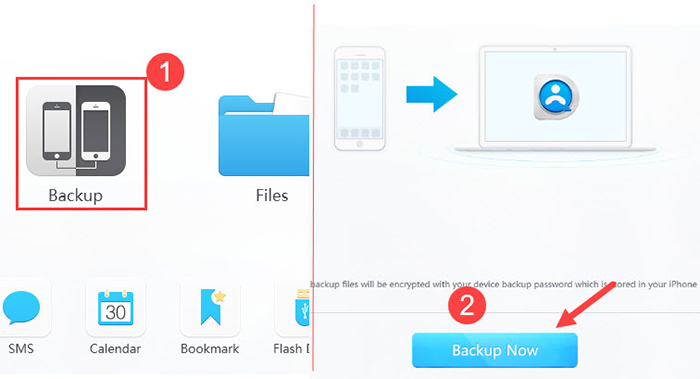
Step 2. Click Backup Now.
You can also tick "Encrypt your backup" before hitting the blue backup button. To do so, you will be required to enter the password when restoring an encrypted backup file.
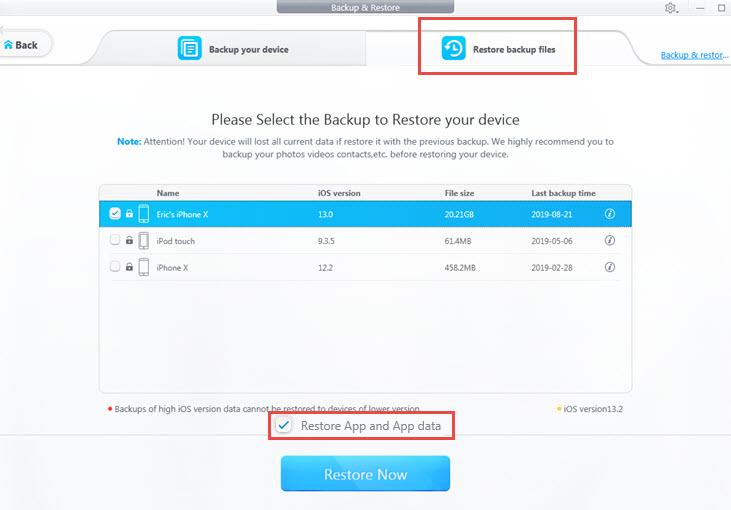
Step 3. When you see a backup completed message, you are ready to restore the backup to a new iPhone. And to do so: turn on the new iPhone device and connect it to the computer. Click the tab "Restore backup files" on the DearMob screen, choose the backup file created in Step 2, and tick Restore App and App data. Click Restore Now, and don't unplug your new iPhone during the transfer process.
Once the transfer is complete, the Apple greeting screen will appear. Proceed with the setup process as you would with a new iPhone. On the home screen, if you see Apps with a cloud icon, simply tap them to download the apps from the App Store. That's all the steps you need to transfer all the data from the old iPhone to the new.
2. How to Selectively Transfer Data from One iPhone to Another
DearMob gives the option to transfer the desired data from one iPhone to another, without erasing existing data on the target iPhone. And here is how:
Step 1. Transfer the data from the old iPhone to the computer.
Select the corresponding tab to transfer the iPhone videos, contacts, podcasts, books, voice memos, custom ringtones, calendar events, safari bookmarks, and FLAC music to iPhone.
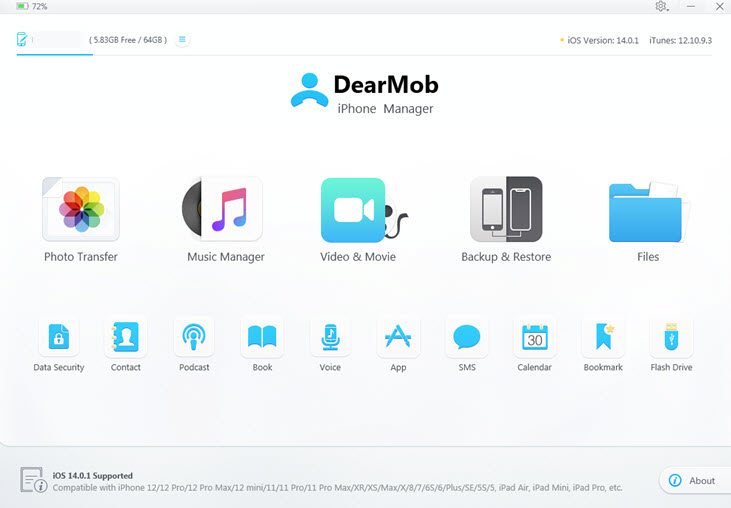
Take photo transfer as an example. Go to Photos > Select all or some of the photos you want > Export.
Tips:
- You can opt to export photos into year/month/date folders in settings, which keeps your photos well-organized.
- Apple ProRaw is natively supported with metadata included.
Step 2. Import the iOS content from the computer to the target iOS device.
Click the + icon to create an album, and hit Add Photo to import old iPhone and iPad photos from Step 1. And you can create multiple albums to better organize photos to be added to the target iPhone.
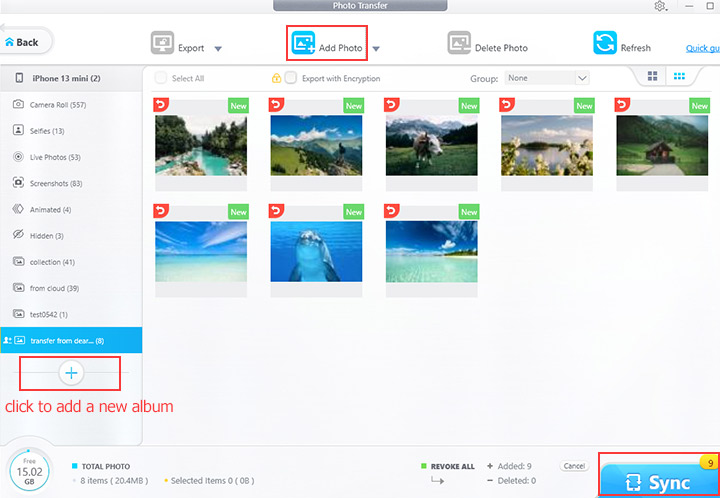
Step 3. Hit Sync to confirm the transfer to the new iPhone.
